At the top of the Wikipedia page for Scarlett Johansson, you see a search box.
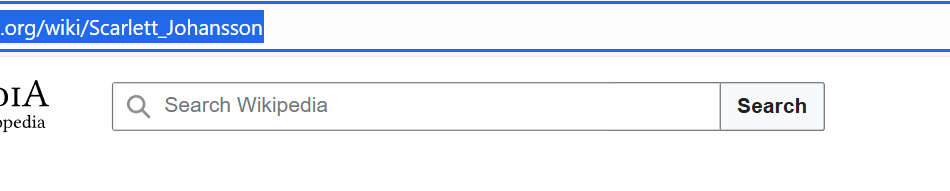
You type something into that box, maybe her name or a movie title, and then you press enter.
The site takes the information you typed and shows you results based on it.
That’s the concept of a form. A form is simply a way for you to give information, and for the site to use that information to do something.
All HTML forms are wrapped inside a <form> tag. That’s the container.
Inside, you decide what kind of inputs you want. Let’s start with two things: a text box and a button.
Since both of these are ways of giving input, we’ll use the <input> tag.
For the text box, the type should be “text”, because it’s a place where you can type text.
<form>

  <input type="text">

</form>
Output

But if you look at the search box on Wikipedia, you’ll notice there’s some grey text inside it that says Search Wikipedia. That’s not typed by the user — it’s called a placeholder.
You can add that by using the placeholder attribute:
<form>

  <input type="text" placeholder="Search Wikipedia">

</form>
Output

Now the box shows that hint text until the user starts typing.
Now let’s add a button so the user can actually submit their search.
For that, we use another <input> but this time with type=”submit”. We can also give it a label using the value attribute so the button shows the word
<input type="submit" value="Search">Output

Now you’ve got a text box where the user can type, a placeholder that guides them, and a button that lets them send the form — just like the search bar on Wikipedia.
So for now, this form won’t actually search Wikipedia or send data anywhere. And that’s fine. The goal here is just to learn how to build the form itself.
Assignment
Create a form that has two things:
A text box where the user can type their name.
A button to submit the form.
Expected Output

Solution
<form>

  <input type="text" placeholder="Enter your name">

  <input type="submit" value="Submit">

</form>
Choose from option
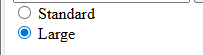
Let’s talk about what you’re seeing on the right side of that Wikipedia page.
You’ll see something like this:

You’re giving input to the page, but not through a text box.
Instead, the page gives you a fixed list of options,
That’s a radio button.
So How Do Radio Buttons Work?
Here’s what’s going on behind the scenes:
- Each option is a radio button
- All options in one group are connected
- The user can only select one at a time
Simple.
To build that in HTML, we give three things:
type="radio"→ tells the browser this is a radio buttonname="group-name"→ groups them togethervalue="something"→ the actual answer that gets saved when selected
So it will be something like:
<input type="radio" name="text-size" value="small"> We’ll see the actual code next. But first, just remember this:
Same name = same group. Only one can be picked.
🧪 Building Your First Radio Button Group
Alright, now let’s actually build a set of radio buttons—just like in the Appearance section on Wikipedia where you pick a text size.
We’ll keep it super simple for now.
<input type="radio" name="text-size" value="small"> Small <br>

<input type="radio" name="text-size" value="standard" checked> Standard <br>

<input type="radio" name="text-size" value="large"> Large
Output
Let’s break it down:
type="radio"→ This makes it a radio button (a circular option).name="text-size"→ All three buttons have the same name, so they’re part of one group. You can only select one of them.value="..."→ This is what gets stored when you choose that option.
So this group gives the user three options for text size, but only lets them pick one.
By the way, br is line break. And start anything after this is next line.
Assignment
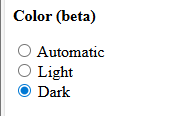
Inside the form, create the Color (beta) section with three radio buttons:
- Automatic
- Light
- Dark
All three should be part of the same group so that only one can be selected at a time.
Expected Output
Solution
<p><strong>Color (beta)</strong></p>

<input type="radio" name="color" value="auto"> Automatic <br>

<input type="radio" name="color" value="light"> Light <br>

<input type="radio" name="color" value="dark" checked> Dark
📝 More Input Types
So far, you’ve seen a few ways to take input from the user:
A text box where they can type
A submit button to send the form
A radio button where they choose one option from a group
But forms can do a lot more than that.
Think about the last time you filled out a form online—maybe signing up for something or giving feedback. It probably had:
A box where you could write a longer answer (not just one line)
A dropdown menu to pick one item from a list
Maybe even checkboxes, dates, or file uploads
HTML gives us input types for all of these.
Dropdown
Sometimes, instead of showing all the options at once (like radio buttons do), you just want a neat little menu where the user clicks and then chooses from a list.
That’s a dropdown.
You’ve seen it everywhere—like when you select your country in a sign-up form. Instead of showing 200 countries as radio buttons, it puts them in one dropdown menu.
🔧 How Do We Make One in HTML?
We use two tags together:
<select> → this creates the dropdown box
<option> → each choice inside the dropdown
Example
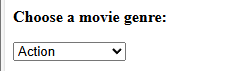
<p><strong>Choose a movie genre:</strong></p>

<select name="genre">

  <option>Action</option>

  <option>Drama</option>

  <option>Comedy</option>

  <option>Science Fiction</option>

</select>
Output
🧠 What’s Happening?
- <
select>is the container. Think of it like the dropdown itself. - Inside it, each
<option>is one choice. - The user can only pick one option by default.
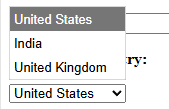
When you open this in your browser, you’ll see a little menu that says “Action”. Click it, and you can pick Drama, Comedy, or Sci-Fi.
🧠 Assignment: Country Dropdown
Inside your form, create a dropdown menu that lets the user pick their country.
👉 Your dropdown should have at least these three options:
- United States
- India
- United Kingdom
Expected Output
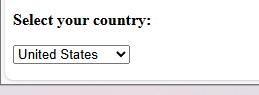
Solution
<p><strong>Select your country:</strong></p>

<select name="country">

  <option>United States</option>

  <option>India</option>

  <option>United Kingdom</option>

</select>
📝 Textarea – For Longer Input
A text box (
<input type="text">) is perfect for short stuff—like a name, email, or one-word answer.
But what if you want the user to write more?
Like a comment, feedback, or even a short story.
That’s where <textarea> comes in.
🔧 How It Works
The <textarea> tag creates a bigger box where users can type multiple lines of text.
You can also control the size of the box using two attributes:
rows→ how tall the box iscols→ how wide the box is
🧪 Example
<p><strong>Leave your feedback:</strong></p>

<textarea rows="4" cols="40"></textarea>
This gives you a box about 4 lines tall and 40 characters wide.
Try typing in it—you can press Enter to go to a new line. That’s the difference between <input> and <textarea>.
🧠 Key Difference
<input type="text">→ one line only<textarea>→ multiple lines, expandable
🧠 Assignment: Add a Comment Box
Inside your form, create a textarea where the user can type their comments.
👉 Make it at least 5 rows tall and 50 columns wide.
Solution
<p><strong>Your Comments:</strong></p>

<textarea rows="5" cols="50"></textarea>
What Is action in a Form?
So far, we’ve been writing forms like this:
<form>

  <!-- inputs here -->

</form>

But in real forms, you’ll usually see this:

<form action="something-goes-here">

  <!-- inputs here -->

</form>
So… What is action?
The action attribute tells the form where to send the data when the user clicks submit.
You can think of it like saying:
“Hey browser, when the user submits this form, send all the answers to this location.”
Example:
<form action="/submit">

  <input type="text" />

  <input type="submit" value="Send" />

</form>
In this example, when the user clicks “Send,” the browser will try to send the form data to /submit.
That could be:
- A page on your site
- A file
- A server
- Or even a script (like in PHP or Python)
What if I don’t have a backend yet?
That’s totally fine.
If you’re just learning, you can do this:
<form action="">or
<form>That way, the browser won’t actually try to send the data anywhere.
You can still build and test your form without needing a database or server.